Create a new report
From the home dashboard page, navigate to Hedge Reports in the Reporting tab or click the link below:

To access the valuation Report Templates, select Valuation Report Templates on the left side of the screen:

Click the Plus (+) icon on the top of the page to build a new report:

- Note: this page will be blank if no reports have been created previously.
Customize your report template by giving it a name. A Template Name must be added. There are also fields for Generated Report Name and Client Specific Template Name which are prefilled with suggested naming conventions. Feel free to customize these to your liking:

Once you have named your report, you can initially customize by selecting which transactions to include and what type of summary is required. The default is to include all transactions and include an ASC820 summary:

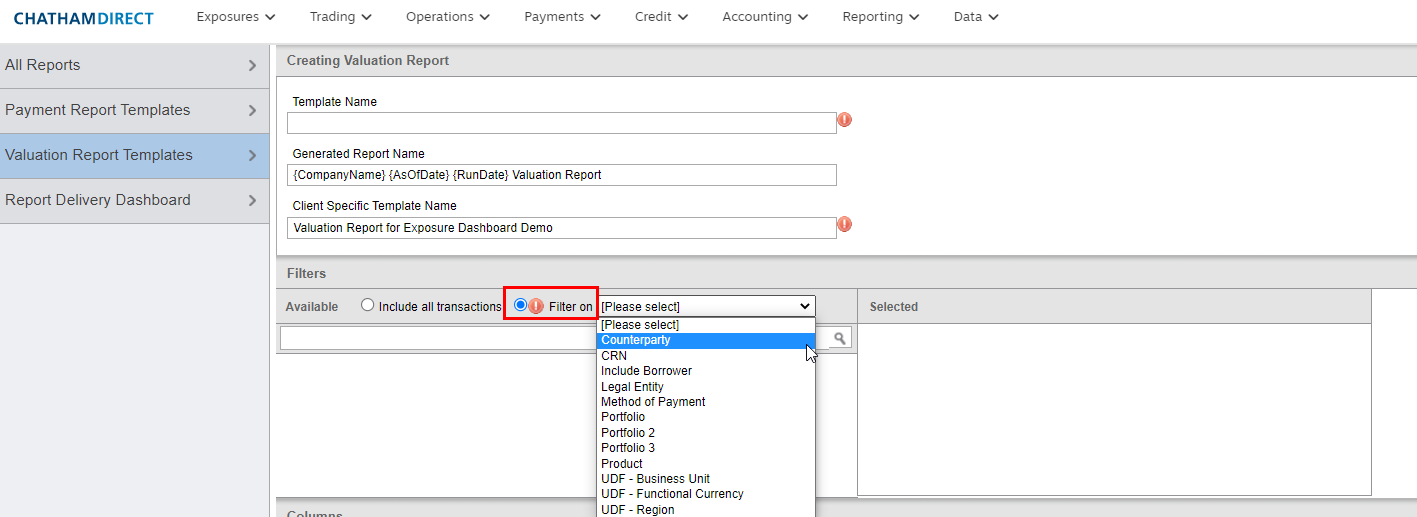
If you select Filter on you will be given a list of fields which can be used to limit the trade data provided in the report. If you have used a field to differentiate different types of trades and only wish to see a certain type in the valuation report this is the preferred way to ensure only the relevant population is displayed. (Ex: the Portfolio field has been used to differentiate between operational and hedge accounting programs):

After a filter has been selected, all the defined values will populate below and allow you to select which of these values is to be used as a filter. Add filters by selecting the plus (+) icon as shown:

Multiple filters can be selected for simultaneous use. Once filters have been selected, they will appear in the Selected box and can be removed by clicking the X to the right of the named value:

You are now ready to add columns to your valuation report. All available columns will be listed initially:

If you would like to select columns from only a certain type, you can refine your view to include only a subset of all available columns:

You can also search for columns by name in the available search bar:

Like filters, by selecting the plus (+) icon you will add a column to your report:

Reports can be highly customized through the selected columns. Reorder columns by clicking and holding the six dots on the left hand of the column name:

Group data by columns:
Keep in mind that you can create multiple groups and a number will appear to define the grouping hierarchy:

- Note: not all columns can be used to group. A {} symbol will appear next to columns that can be used for grouping.
Sort Data within Columns:
Similar to grouping, you can sort on multiple columns and a number will appear to define the sorting hierarchy:

- Note: not all columns can be sorted. AZ will appear next to columns that can sorted.
If desired, the report can be set to a Month End Report and to have the report automatically emailed at month end.

- Note: Please refer to “Set Up Reports For Automatic Delivery” guide for further details on creating and managing this type of report.
ChathamDirect users will drop down as optional receivers of the automated Month End Report. Select users to receive the report as desired. Furthermore, you can decide whether this will be sent To the user, CC, or BCC.
The report will be generated with Chatham standard formatting, headers, and column totals. If the report is desired in more of a raw form, you can uncheck the formatting boxes. You can also customize the date style:

The final step is to save your new valuation report template:

