Introduction
This guide provides details on how to create new templates for accounting reports, including information on how to filter the transactions to show on reports and how to choose what trade details will display on the report and how they will be grouped and sorted.
Create a New Report
From the home dashboard page, navigate to Accounting Reports in the Reporting tab or click the link below:

To access any accounting specific templates, select from the following:
- Accounting Templates
- Detailed JE Templates
- OCI Report Templates

Select the New Template button at the top of the page

- Note: this page will be blank if no reports have been created previously
From here, you can select which type of template you’d like to create:

Customize your report template by giving it a name. The Template Name and Tab Name are required fields. There are also fields for the filtering your data (you have the option to include all transactions, or to filter through them).

After a filter has been selected, all the defined values will populate below and allow you to select which of these values is to be used as a filter. Add filters by selecting the plus (+) sign as shown:

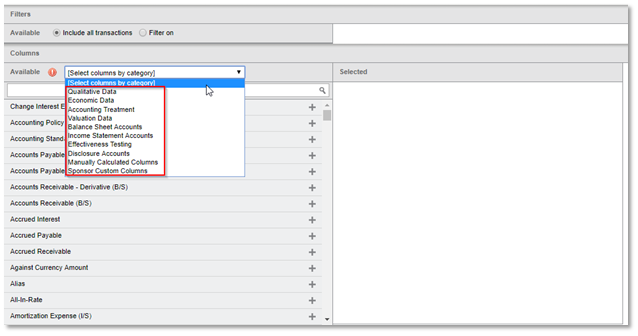
Once you have named your report, you are now ready to select which columns you’d like to include. You can do this by filtering the column options from the drop down menu or selecting the desired column categories from the longer list.
To select specific categories to add to your columns for the template, press to plus (+) sign. You can also search for specific columns in the search bar. Once the columns are chosen, you will see the selected columns populate in the box on the right side titled Selected:

Once you have determined which columns you want to select, there are some other customizations you can make to groups of column titles.
- Titles with {} indicate your ability to group them together, and pressing on them respectively puts them in the order you want
- Titles with AZ indicate your ability to sort them ascendingly, and pressing on them respectively puts them in the order you want
- The X at the end of each title allows you to delete it from your selection
Note: You can also change how the name of a column appears on the template by selecting the name as it appears and typing in the name you prefer
 Before pressing Save Template, don’t forget to check the boxes for Include report formatting and branding and Save as favorite if you would like the report to contain Chatham standard formatting and you want the report to appear in your favorites section:

